
番茄技巧可以帮助您了解Arduino的方法,并且实际上会产生一些有用的东西。
目标
In case you’d like to try to figure out how to set this up before looking ahead, here’s what we’re trying to do. We’ll have three lights; one for “work,” one for “break,” and a warning light. The work light will stay on for 25 minutes, and the warning light will also be on for the last two minutes of that interval. After 25 minutes, the work and warning lights will turn off, and the break light will turn on for 5 minutes (the warning light will again be on for the last two minutes).
还附带的该按钮将延迟更换灯两分钟,以便给您一些额外的工作时间或休息时间。
您需要什么
对于此项目,我们将使用以下部分–
第1步:设置一切
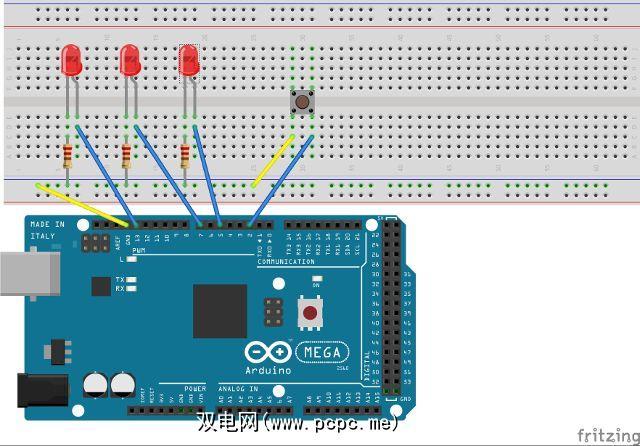
将每个LED放在面包板上的不同列中(最简单的做法是将它们间隔开一点),然后放置按钮再向下一点。确保按钮朝向正确的方向-按钮的单侧有两组两个引脚,并且这些引脚需要在同一行中。
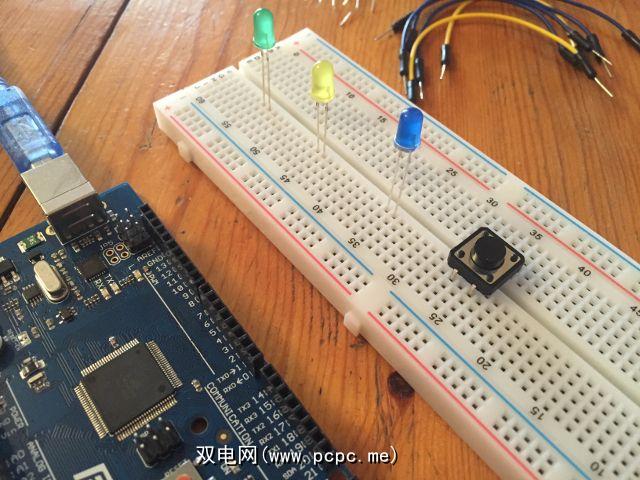
从引脚5引出线,7和13到包含蓝色,黄色和绿色LED的负极(负极是两个中的较短者)的列。接下来,在每个正极脚的同一列中放置一个电阻器,并将其连接到面包板侧面的负极轨(蓝色的,尽管颜色并不重要,为了清楚起见,通常使用蓝色)
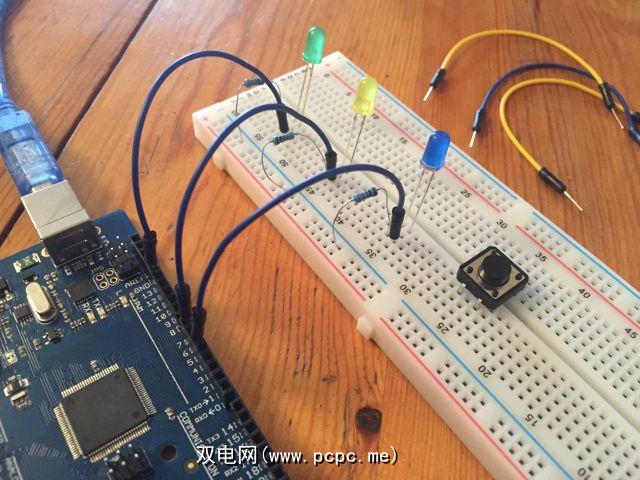
也将一条电线从面包板上的蓝色导轨连接到按钮上的一条腿,将另一条电线从另一条腿(在同一侧)引到Arduino的引脚2。然后将蓝色导轨接地到Arduino的GND引脚上。

下面的图应该消除任何混乱:
就是这样!现在开始编程。
为Arduino编程
下面是Pomoduino计时器的代码–仔细阅读内联注释,因为它们解释了代码的每一步是什么。
int green = 13;int yellow = 7;int blue = 5;int ledStateGreen = LOW;int ledStateBlue = LOW;long previousMillis = 0;long interval;int buttonPin = 2;int buttonState = 1;bool pressed = 0;long pressTime = 0;int phase = 0;void setup() { pinMode(green, OUTPUT); pinMode(yellow, OUTPUT); pinMode(blue, OUTPUT); pinMode(buttonPin, INPUT_PULLUP); digitalWrite(buttonPin, HIGH);}void loop() { // update current time and state of buttonunsigned long currentMillis = millis();int buttonState = digitalRead(buttonPin);// measure time since last button presslong progress = currentMillis - previousMillis;// check to see if button has been pressed// over 2 seconds since last press// (to prevent multiple presses registering)if ((pressTime - currentMillis) > 2000){ if(buttonState == 0){ pressed = 1; pressTime = currentMillis;} else{ pressed = 0;}}// phase 0 is "work" phase// if button has been pressed, add 2 minutes to work timerif (phase == 0){ if (pressed == 1){ interval = 1620000;} // if interval is over, record current // time for measuring next interval if(currentMillis - previousMillis > interval) { previousMillis = currentMillis; // set green and blue LED states if (ledStateGreen == LOW){ ledStateGreen = HIGH; ledStateBlue = LOW;} else { ledStateGreen = LOW;} // apply LED states to LEDs // reset interval and switch to "break" phase digitalWrite(green, ledStateGreen); digitalWrite(blue, ledStateBlue); interval = 1500000; buttonState = 1; phase = 1; }}else { // if button has been pressed, add 2 minutes to break timer if (pressed == 1){ interval = 420000;} // if interval is over, record current // time for measuring next interval if(currentMillis - previousMillis > interval) { previousMillis = currentMillis; // set blue and green LED states if (ledStateBlue == HIGH){; ledStateBlue = LOW; } else { ledStateBlue = HIGH; ledStateGreen = LOW;} // apply LED states to LEDs // reset interval and set to "work" phase digitalWrite(green, ledStateGreen); digitalWrite(blue, ledStateBlue); interval = 300000; buttonState = 1; phase = 0; }}// calculate time left in intervalunsigned long timeLeft = (interval - progress);// if there are less than two minutes left, light up yellow LEDif (timeLeft < 120000) { digitalWrite(yellow, HIGH); }else { digitalWrite(yellow, LOW); }// reset pressed variable pressed = 0;}注意:当您对此进行测试时,您可能不想等待25分钟以查看其是否有效。在下面的视频中,我将时间间隔设置为绿色的5秒,蓝色的2秒和黄色的1秒。使用较短的时间间隔来确保一切正常运行,然后再使用它来跟踪时间!
一旦一切都连接好并将代码输入到IDE中,就可以开始使用了!上载草图,您将拥有一个带有2分钟延迟按钮的工作番茄计时器。如果警告灯亮起并且您需要更多时间,只需按一下按钮即可。
您可能会注意到,该按钮直接连接至Arduino输入引脚。通过使用Arduino内置的上拉电阻器之一,您无需在5V端口到按钮之间连接导线,也不需要使用与之匹配的电阻器。您可以在Arduino参考中获取有关数字引脚的更多信息。
更多高级挑战
如果您已经制作了Pomoduino,并且希望采用稍微高级一点的技术,您可以尝试以下任何一种方法:
其他优秀初学者项目
标签: