您的下一个桌面角色扮演游戏是否想要一些独特的东西?带有自定义图形的D20电子D20怎么样?今天,我将向您展示如何使用Arduino和一些简单的零件来构建自己的产品。
如果您以前从未使用过Arduino,请不要担心,我们有一个入门指南。
构建计划
这是一个简单的项目。 Arduino将驱动OLED显示屏,并且一个按钮将使模具死掉。自定义图形将显示关键命中或关键错位。您可以轻松地将代码修改为D8,D10或D12。
您需要的东西

这些是构建自己的D20所需的核心部分。您可能希望将其安装在外壳中(如下所述),并将电路焊接到更永久的状态。以下是您需要执行此操作的其他零件:
这些OLED显示屏非常酷。通常可以购买白色,蓝色,黄色或这三种的混合物。我购买了蓝色的,以匹配我的情况。确保您获得的是 I2C 模型而不是 SPI 。
几乎所有Arduino都适用。我选择了Nano,因为它们足够小,可以放入箱子中。查看我们的购买指南以获取有关Arduino型号的更多信息。
电路
这是您需要的电路:
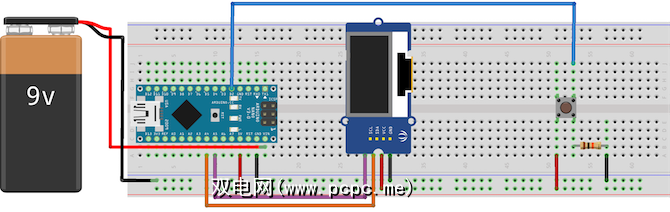
连接 VCC >和 GND 在OLED显示屏上连接到Arduino + 5V 和地。将Arduino上的模拟4 连接到标有 SDA 的引脚。将模拟5 连接到 SCL 引脚。这些引脚包含使用I2C总线驱动显示器所需的电路。确切的引脚会因型号而异,但是Nano和Uno会使用A4和A5。如果您未使用Uno或Nano,请查看模型的线库文档。
将电池接地并使用 VIN 引脚。这表示输入电压,可以接受各种不同的DC电压-但请先检查您的特定型号,有时可能会略有不同。
将按钮连接到数字引脚2 。注意10k如何?电阻接地。这个非常重要!这称为下拉电阻,它可以防止Arduino在按下按钮时检测到虚假数据或干扰。它还可以保护电路板。如果不使用该电阻,则+ 5V会直接接地。这被称为短短路,是杀死Arduino的简便方法。
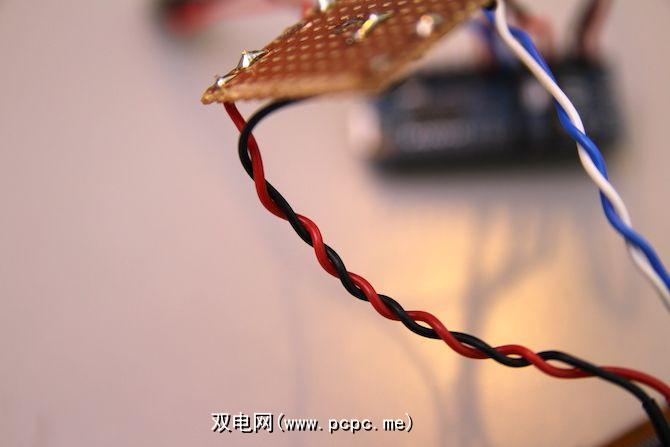
如果要焊接此电路,请使用热缩管保护连接:

确保不要将其加热过多,只有在确定电路能够正常工作后才进行加热。您可能还希望将电缆成对绞合。这样可以使它们保持整洁并有助于保护它们免受不必要的压力:
按钮测试
现在,您已经建立了电路,请上传此测试代码(确保选择正确的电路板并 Tools> Board 和 Tools> Port 菜单中的端口):
const int buttonPin = 2; // the number of the button pinvoid setup() { pinMode(buttonPin, INPUT); // setup button Serial.begin(9600); // setup serial}void loop(){ if(digitalRead(buttonPin) == HIGH) { Serial.print("It Works"); delay(250); }}上传后,请保持Arduino通过USB连接并打开串行监视器( 右上角>串行监视器)。每次按下按钮,您应该会看到它有效字样。
如果什么也没发生,请仔细检查电路。
OLED设置< /
You need to install two libraries to drive the display. Download the Adafruit_SSD1306 and Adafruit-GFX [No Longer Available] libraries from Github, and save them into your library folder. If you are not sure where you library folders are, go read my retro gaming tutorial , where I configure this same display in more detail.
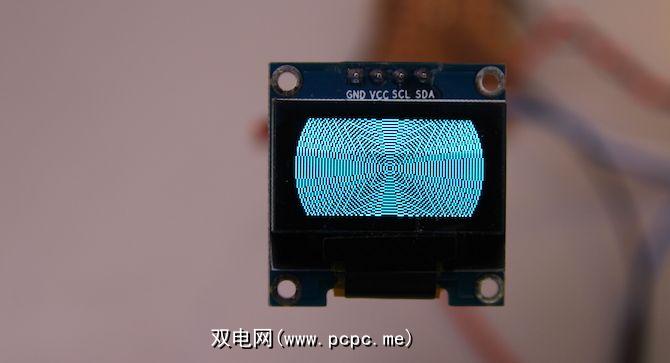
重新启动Arduino IDE并从文件>示例菜单上传测试草图。选择 Adafruit SSD1306 ,然后选择 ssd1306_128x64_i2c 。上载此代码(需要一段时间),然后您应该会在显示器上看到很多形状和图案:
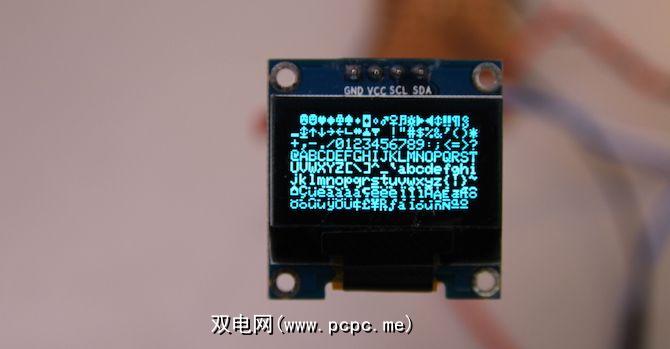
如果什么都没发生,请仔细检查您的连接。如果在检查后仍然无法使用,则需要修改示例代码。
更改此行(在 setup 函数的开头):
display.begin(SSD1306_SWITCHCAPVCC, 0x3D);为此:
display.begin(SSD1306_SWITCHCAPVCC, 0x3C);这将告诉库有关正在使用的显示的特定详细信息。现在应该将所有内容都设置为继续进行构建。
案例
如果要在面包板上构建,或者不想将其装箱,则可以跳过此步骤。
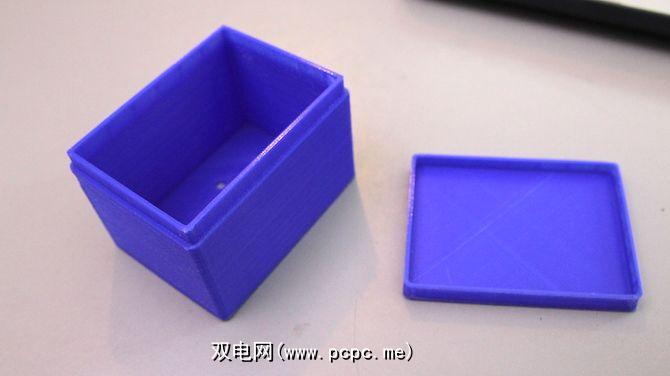
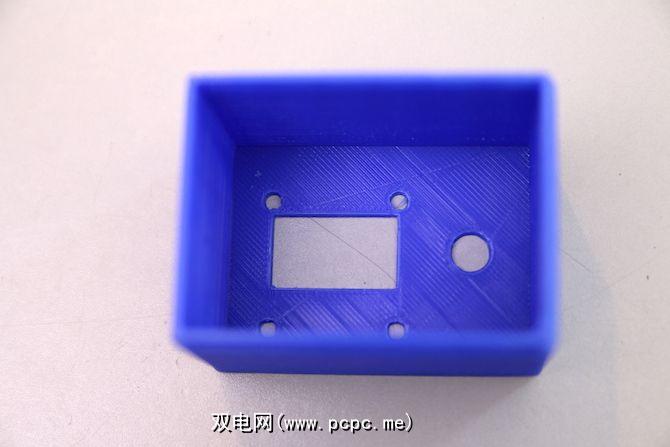
我设计了该盒子并进行了3D打印。在Thingiverse上获取文件。如果您没有3D打印机,请不要担心-在线服务3D集线器和Shapeways提供在线打印服务。
您可以轻松地用木头制作此盒子,也可以购买塑料工程盒。
盖子是简单的推入配合设计,并且包含一些用于硬件的切口:
代码
现在一切准备就绪,时间到了代码。以下是它在伪代码中的工作方式:
if button is pressed generate random number if random number is 20 show graphic else if random number is 1 show graphic else show number为使其正常工作,需要生成一个随机数-这就是死机。 Arduino有一个称为 random 的随机数生成器,但不应使用它。虽然对于基本的随机任务已经足够好了,但对于电子芯片来说,随机性还不够。原因有些复杂,但是如果您对boallen.com感兴趣,可以阅读更多内容。
通过sirleech在Github上下载TrueRandom库。将此添加到您的库文件夹中,然后重新启动IDE。
现在创建一个新文件并设置您的初始代码(或只是从GitHub上获取完成的代码):
#include <SPI.h>#include <Wire.h>#include <Adafruit_GFX.h>#include <Adafruit_SSD1306.h>#include <TrueRandom.h> Adafruit_SSD1306 display(4);void setup() { display.begin(SSD1306_SWITCHCAPVCC, 0x3C); // setup the OLED pinMode(buttonPin, INPUT); // setup button }void loop() { }This code configures the OLED, and includes all the libraries you need to communicate with it, along with your new random number library. Now add this to the main loop:
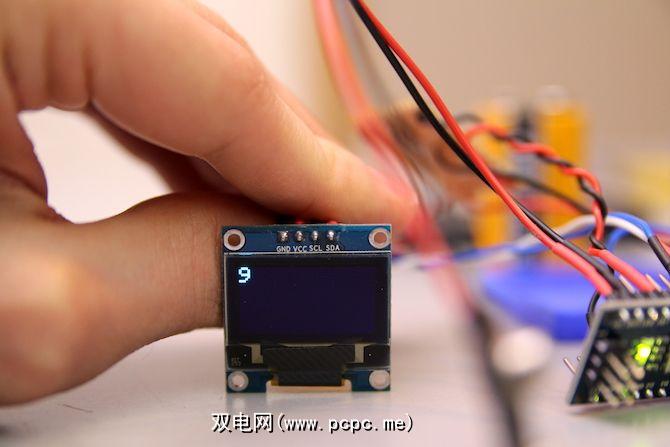
if(digitalRead(buttonPin) == HIGH) { delay(15); if(digitalRead(buttonPin) == HIGH) { display.fillScreen(BLACK); // erase the whole display display.setTextColor(WHITE); display.setTextSize(2); display.setCursor(0, 0); display.println(TrueRandom.random(1, 21)); // print random number display.display(); // write to display delay(100); }}在一分钟内基本,但它是一个正常工作的D20。每当按下按钮时,屏幕上就会显示一个1到20之间的随机数字:
这很好用,但是有点无聊。让我们做得更好。创建两个新方法 drawDie 和 eraseDie :
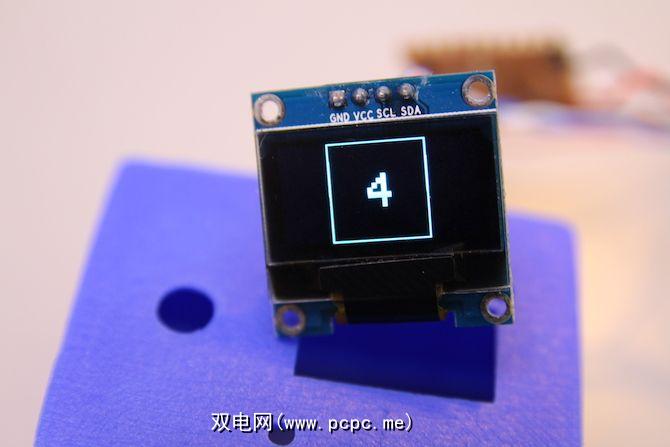
void drawDie() { display.drawRect(32, 0, 64, 64, WHITE);}这些方法将在屏幕中间绘制一个模具。您可能希望通过绘制D20或D12等使事情变得更复杂,但是绘制基本的六面模具更简单。基本用法如下:
drawDie();接下来,修改您的主循环以绘制随机数,该随机数仅在中间较大。将文本大小和光标更改为:
display.setTextColor(WHITE);display.setCursor(57, 21);现在看起来好多了:
唯一的问题是数字大于9:
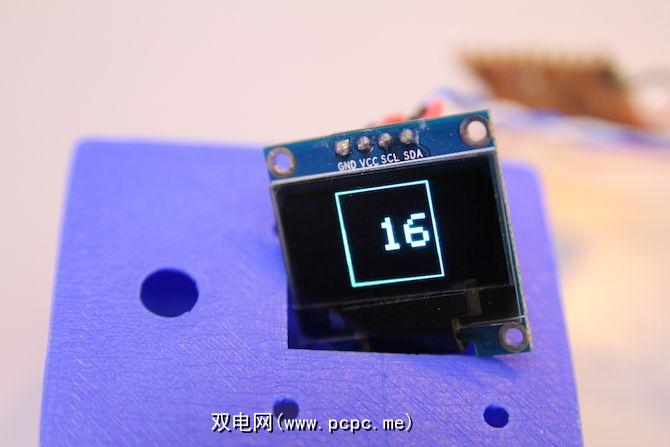
解决这个问题很简单。小于10的任何数字都将光标设置在与10或更大的数字不同的位置。替换此行:
display.setCursor(57, 21);与此:
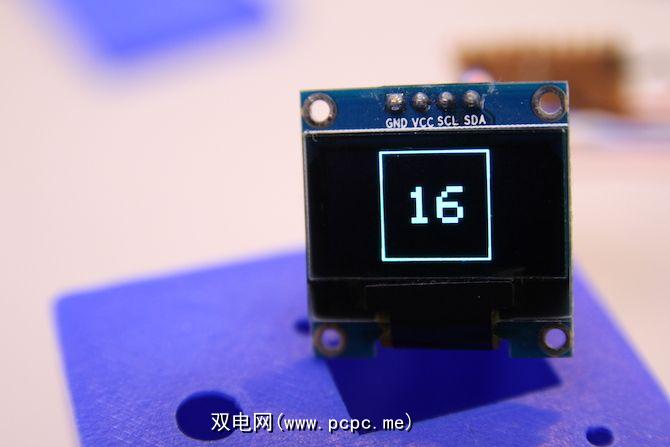
int roll = TrueRandom.random(1, 21); // store the random numberif (roll < 10) { // single character number display.setCursor(57, 21); }else { // dual character number display.setCursor(47, 21); }这是现在的样子:
当您滚动一个严重击中或错过。涉及几个步骤,但这是一个足够简单的过程。
找到您要使用的合适图像(越简单越好,因为显示仅是单色的)。这是我使用的图像:

您要使用的任何图像都需要转换为十六进制数组。这是代码形式的图像表示。有许多工具可以执行此操作,其中一些是专门为OLED显示器编写的。最简单的方法是使用PicturetoC_Hex在线工具。以下是所需的设置:
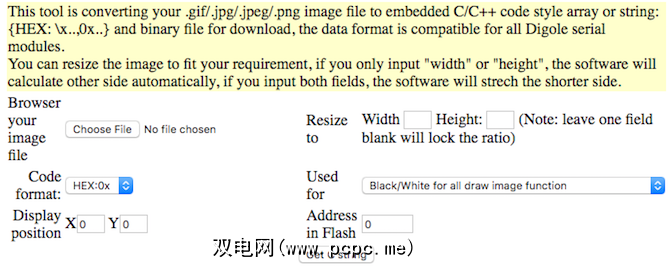
上传图片,并将代码格式设置为 HEX:0x 。将用于的设置为所有绘制图像功能的黑色/白色。将所有其他选项保留为默认值。您可以根据需要在此处调整图像大小。按获取C字符串,您应该会看到图像数据出现:
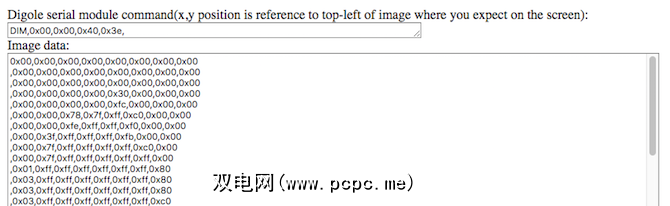
您将在一分钟内需要此生成的数据。创建两个名为 drawExplosion 和 drawSkull 的函数(或适合您的版本的名称)。这是代码:
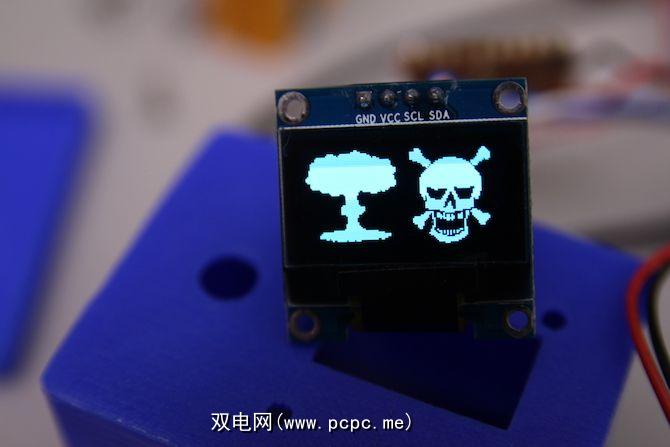
void drawExplosion() { // store image in EEPROM static const unsigned char PROGMEM imExp[] = {0x00,0x00,0x00,0x00,0x00,0x00,0x00,0x00,0x00,0x00,0x00,0x00,0x00,0x00,0x00,0x00,0x00,0x00,0x00,0x00,0x00,0x00,0x00,0x00,0x00,0x00,0x00,0x00,0x30,0x00,0x00,0x00,0x00,0x00,0x00,0x00,0xfc,0x00,0x00,0x00,0x00,0x00,0x78,0x7f,0xff,0xc0,0x00,0x00,0x00,0x00,0xfe,0xff,0xff,0xf0,0x00,0x00,0x00,0x3f,0xff,0xff,0xff,0xfb,0x00,0x00,0x00,0x7f,0xff,0xff,0xff,0xff,0xc0,0x00,0x00,0x7f,0xff,0xff,0xff,0xff,0xff,0x00,0x01,0xff,0xff,0xff,0xff,0xff,0xff,0x80,0x03,0xff,0xff,0xff,0xff,0xff,0xff,0x80,0x03,0xff,0xff,0xff,0xff,0xff,0xff,0x80,0x03,0xff,0xff,0xff,0xff,0xff,0xff,0xc0,0x03,0xff,0xff,0xff,0xff,0xff,0xff,0xf0,0x07,0xff,0xff,0xff,0xff,0xff,0xff,0xf0,0x07,0xff,0xff,0xff,0xff,0xff,0xff,0xf0,0x07,0xff,0xff,0xff,0xff,0xff,0xff,0xe0,0x07,0xff,0xff,0xff,0xff,0xff,0xff,0xc0,0x0f,0xff,0xff,0xff,0xff,0xff,0xff,0xe0,0x1f,0xff,0xff,0xff,0xff,0xff,0xff,0xe0,0x1f,0xff,0xff,0xff,0xff,0xff,0xff,0xe0,0x0f,0xff,0xff,0xff,0xff,0xff,0xff,0xf0,0x03,0xff,0xff,0xff,0xff,0xff,0xff,0xf0,0x03,0xff,0xff,0xff,0xff,0xff,0xff,0xf0,0x03,0xff,0xff,0xff,0xff,0xff,0xff,0xe0,0x01,0xff,0xff,0xff,0xff,0xff,0xff,0x00,0x00,0x0f,0xff,0xff,0xff,0xff,0xfe,0x00,0x00,0x07,0xff,0xff,0xf9,0xff,0xd8,0x00,0x00,0x00,0x3f,0xff,0xf0,0x0f,0x00,0x00,0x00,0x00,0x1f,0x1f,0xf0,0x00,0x00,0x00,0x00,0x00,0x00,0x0f,0xe0,0x00,0x00,0x00,0x00,0x00,0x00,0x0f,0xe0,0x00,0x00,0x00,0x00,0x00,0x00,0x0f,0xe0,0x00,0x00,0x00,0x00,0x00,0x00,0x0f,0xf0,0x00,0x00,0x00,0x00,0x00,0x00,0x0f,0xf0,0x00,0x00,0x00,0x00,0x00,0x00,0x0f,0xf0,0x00,0x00,0x00,0x00,0x00,0x00,0x3f,0xf8,0x00,0x00,0x00,0x00,0x00,0x00,0x7f,0xff,0x00,0x00,0x00,0x00,0x00,0x00,0x7f,0xff,0x00,0x00,0x00,0x00,0x00,0x00,0x7f,0xff,0x00,0x00,0x00,0x00,0x00,0x00,0x7f,0xfe,0x00,0x00,0x00,0x00,0x00,0x00,0x7f,0xfc,0x00,0x00,0x00,0x00,0x00,0x00,0x0f,0xf0,0x00,0x00,0x00,0x00,0x00,0x00,0x07,0xf0,0x00,0x00,0x00,0x00,0x00,0x00,0x07,0xe0,0x00,0x00,0x00,0x00,0x00,0x00,0x07,0xe0,0x00,0x00,0x00,0x00,0x00,0x00,0x07,0xe0,0x00,0x00,0x00,0x00,0x00,0x00,0x07,0xf0,0x00,0x00,0x00,0x00,0x00,0x00,0x0f,0xf0,0x00,0x00,0x00,0x00,0x00,0x00,0x0f,0xf8,0x00,0x00,0x00,0x00,0x00,0x00,0x0f,0xfc,0x00,0x00,0x00,0x00,0x00,0x00,0x1f,0xff,0x00,0x00,0x00,0x00,0x00,0x0f,0xff,0xff,0xff,0x00,0x00,0x00,0x07,0xff,0xff,0xff,0xff,0xf0,0x00,0x00,0x0f,0xff,0xff,0xff,0xff,0xff,0x00,0x00,0x1f,0xff,0xff,0xff,0xff,0xff,0x00,0x00,0x1f,0xff,0xff,0xff,0xff,0xfc,0x00,0x00,0x01,0xbf,0xff,0xff,0xff,0x30,0x00,0x00,0x00,0x13,0xf7,0xb8,0x00,0x00,0x00,0x00,0x00,0x00,0x00,0x00,0x00,0x00,0x00,0x00,0x00,0x00,0x00,0x00,0x00,0x00,0x00 }; display.drawBitmap(0, 0, imExp, 64, 62, 1); // draw mushroom cloud}void drawSkull() { // store image in EEPROM static const unsigned char PROGMEM imSku[] = {0x00,0x00,0x00,0x00,0x00,0x00,0x00,0x00,0x00,0x00,0x00,0x00,0x00,0x00,0x00,0x00,0x00,0x00,0x00,0x00,0x00,0x00,0x00,0x00,0x00,0xe0,0x00,0x00,0x00,0x00,0x30,0x00,0x00,0xf0,0x00,0x00,0x00,0x00,0x78,0x00,0x07,0xf0,0x00,0x00,0x00,0x00,0xfc,0x00,0x07,0xf8,0x00,0x00,0x00,0x00,0xfe,0x00,0x07,0xf8,0x00,0x00,0x00,0x01,0xfe,0x00,0x07,0xfc,0x00,0x00,0x00,0x01,0xfe,0x00,0x07,0xfe,0x00,0x3f,0xc0,0x03,0xfe,0x00,0x01,0xff,0x81,0xff,0xfc,0x07,0xec,0x00,0x00,0x3f,0xc7,0xff,0xff,0x1f,0xc0,0x00,0x00,0x0f,0xcf,0xff,0xff,0xdf,0x00,0x00,0x00,0x07,0xbf,0xff,0xff,0xee,0x00,0x00,0x00,0x01,0x7f,0xff,0xff,0xf0,0x00,0x00,0x00,0x00,0xff,0xff,0xff,0xf8,0x00,0x00,0x00,0x01,0xff,0xff,0xff,0xf8,0x00,0x00,0x00,0x03,0xff,0xff,0xff,0xfc,0x00,0x00,0x00,0x07,0xff,0xff,0xff,0xfe,0x00,0x00,0x00,0x0f,0xff,0xff,0xff,0xff,0x00,0x00,0x00,0x0f,0xff,0xff,0xff,0xff,0x00,0x00,0x00,0x1f,0xff,0xff,0xff,0xff,0x80,0x00,0x00,0x1f,0xff,0xff,0xff,0xff,0x80,0x00,0x00,0x1f,0xff,0xff,0xff,0xff,0x80,0x00,0x00,0x1f,0xff,0xff,0xff,0xff,0x80,0x00,0x00,0x1f,0xff,0xff,0xff,0xff,0x80,0x00,0x00,0x1f,0xff,0xff,0xff,0xff,0x80,0x00,0x00,0x1e,0x3f,0xff,0x3f,0xc7,0x80,0x00,0x00,0x1e,0x0c,0x0f,0x00,0x07,0x80,0x00,0x00,0x1e,0x00,0x0f,0x00,0x0f,0x80,0x00,0x00,0x1e,0x00,0x19,0x80,0x0f,0x00,0x00,0x00,0x0f,0x00,0x19,0x80,0x0f,0x00,0x00,0x00,0x0d,0x00,0x30,0xc0,0x1f,0x00,0x00,0x00,0x05,0x80,0x70,0xc0,0x1e,0x00,0x00,0x00,0x05,0xf0,0xe0,0xe0,0x36,0x00,0x00,0x00,0x01,0xff,0xe0,0x7f,0xf0,0x00,0x00,0x00,0x03,0xff,0xc4,0x7f,0xf0,0x00,0x00,0x00,0x03,0xff,0xcc,0x7f,0xf0,0x00,0x00,0x00,0x03,0xff,0xcc,0x7f,0xf0,0x00,0x00,0x00,0x03,0xff,0x9e,0x7f,0xf0,0x00,0x00,0x00,0x00,0xff,0xfe,0x7f,0xc0,0x00,0x00,0x00,0x00,0x01,0xff,0xf8,0x1c,0x00,0x00,0x00,0x03,0xe0,0x3f,0x01,0xbf,0x00,0x00,0x00,0x07,0xa6,0x40,0x09,0x9f,0x80,0x00,0x00,0x1f,0x27,0x5a,0x39,0x9f,0xf8,0x00,0x01,0xff,0x27,0xdb,0x39,0x0f,0xfc,0x00,0x03,0xfe,0x31,0x7f,0x39,0x07,0xfc,0x00,0x03,0xfc,0x10,0x1a,0x02,0x03,0xf8,0x00,0x03,0xf8,0x10,0x00,0x02,0x01,0xf0,0x00,0x01,0xf8,0x10,0x00,0x02,0x01,0xe0,0x00,0x00,0x78,0x10,0x00,0x02,0x00,0xe0,0x00,0x00,0x70,0x30,0x00,0x02,0x00,0x00,0x00,0x00,0x30,0x20,0x00,0x03,0x00,0x00,0x00,0x00,0x00,0x64,0x00,0x1b,0x00,0x00,0x00,0x00,0x00,0x73,0x55,0x63,0x00,0x00,0x00,0x00,0x00,0xf9,0x55,0x4f,0x00,0x00,0x00,0x00,0x00,0x7f,0x14,0x1f,0x00,0x00,0x00,0x00,0x00,0x1f,0xe0,0xfe,0x00,0x00,0x00,0x00,0x00,0x0f,0xff,0xfc,0x00,0x00,0x00,0x00,0x00,0x07,0xff,0xf0,0x00,0x00,0x00,0x00,0x00,0x03,0xff,0xc0,0x00,0x00,0x00,0x00,0x00,0x00,0x38,0x00,0x00,0x00,0x00,0x00,0x00,0x00,0x00,0x00,0x00,0x00,0x00,0x00,0x00,0x00,0x00,0x00,0x00,0x00,0x00 }; display.drawBitmap(0, 0, imSku, 60, 64, 1); // draw skull cloud}如果您想使用我使用过的图像,请继续并复制代码。如果要使用自己生成的图像,请根据需要将字节码复制到 imSku 和 imExp 数组中。
以下是这些图像在显示屏上看起来像:
该代码最重要的部分是这一行:
static const unsigned char PROGMEM imSku[]这告诉Arduino将图像存储在EEPROM中(什么是EEPROM?) 。这样做的原因是简单的; Arduino的内存有限,并且全部用于存储图像可能不会留下任何剩余代码供您执行
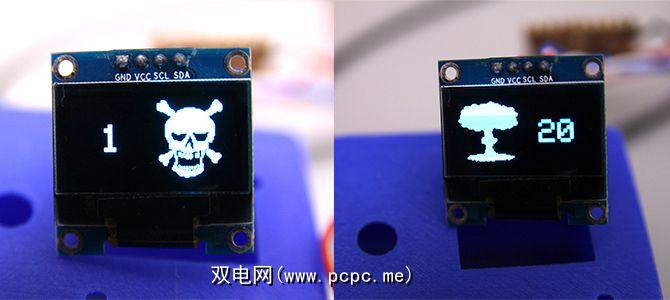
修改主 if 语句以在出现以下情况时显示这些新图形:一卷或二十卷。请注意代码行,以显示与图像一起滚动的数字:
if(roll == 20) { drawExplosion(); display.setCursor(80, 21); display.println("20"); }else if(roll == 1) { display.setCursor(24, 21); display.println("1"); drawSkull(); }else if (roll < 10) { // single character number display.setCursor(57, 21); display.println(roll); // write the roll drawDie(); // draw the outline}else { // dual character number display.setCursor(47, 21); display.println(roll); // write the roll drawDie(); // draw the outline}这些新滚动的外观如下:
这一切都在代码侧(抓取)如果您跳过所有这些,则来自GitHub的代码)。您可以轻松地将其修改为D12,D8等。
最终装配
现在,其他所有操作都已完成,现在该将所有内容打包。将显示屏固定在螺栓上,确保不要过度拧紧螺栓。这可能是最困难的部分。我这样做是为了使显示器破裂,所以您不妨使用一些塑料垫圈。我从Plasticard上切了一些方块:
小的螺母和螺栓可能很难连接。 提示::在螺丝起子的末端使用一小块Blu-Tack首先固定螺母:
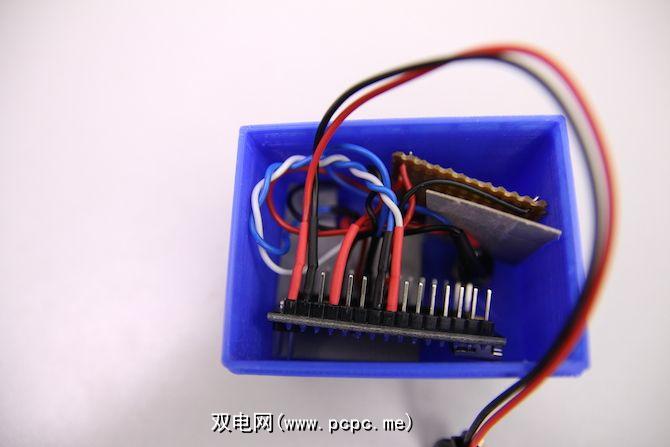
拧下按钮,连接电池,然后合上盖子。注意不要夹住任何电线,或将它们捆得太紧,以免造成短路。根据尾线的长度,您可能需要使用某种绝缘保护裸露的连接(串行盒效果很好):
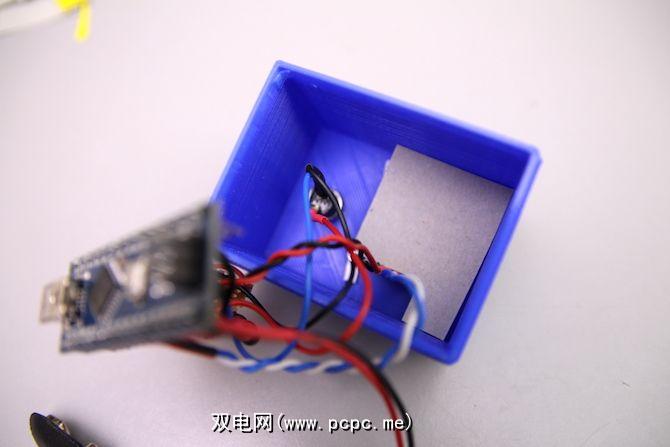
内部结构如下:
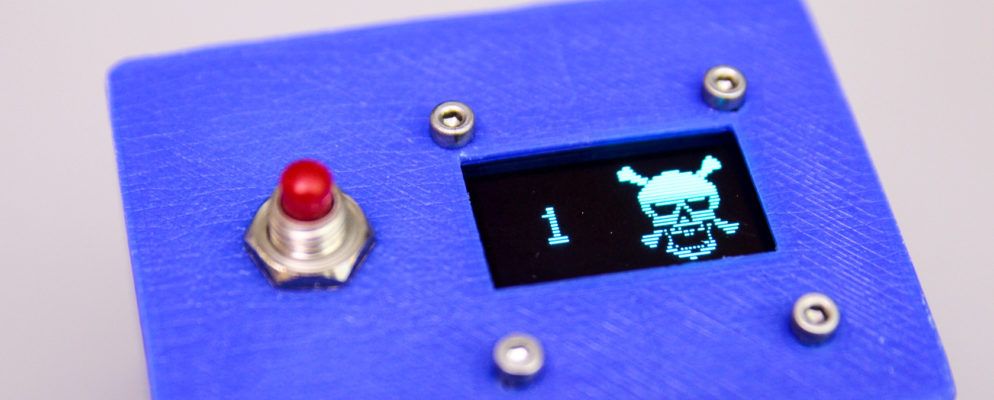
这是成品:
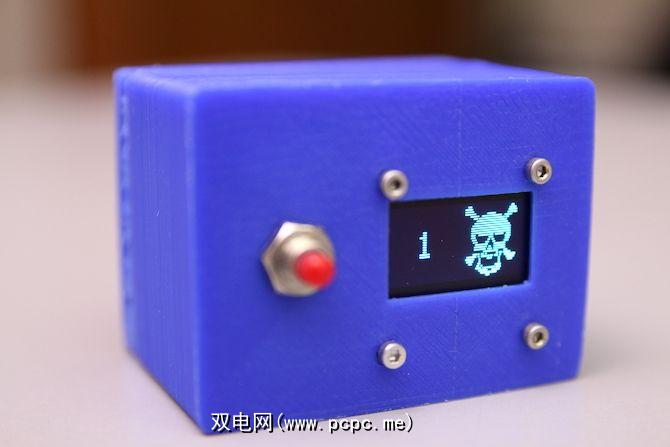
您现在应该是电子D20的骄傲拥有者!
您进行了哪些修改?您更改图像了吗?在评论中让我们知道,我们很想看看您的工作!